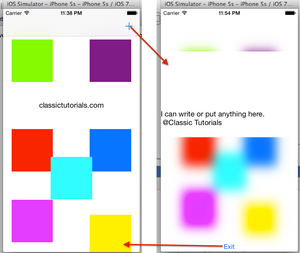
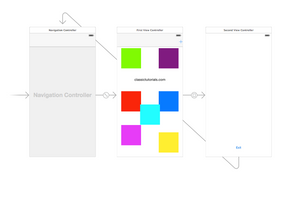
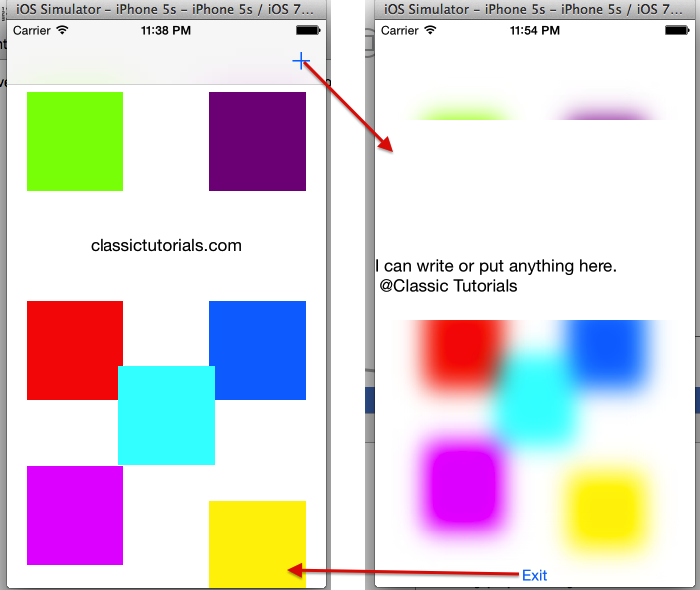
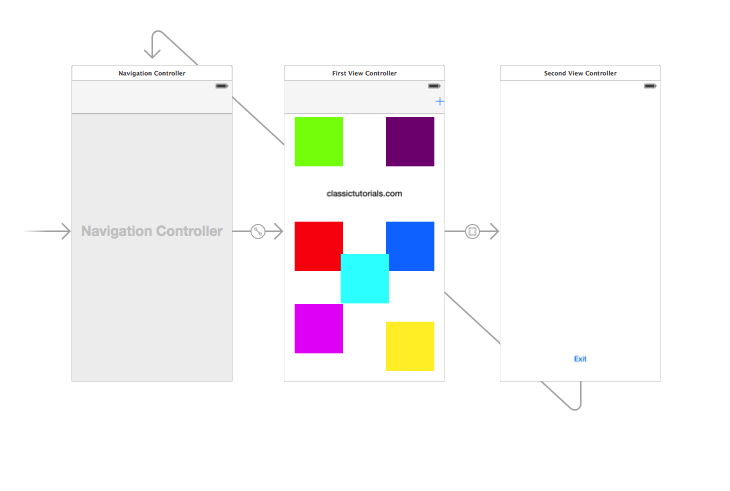
In this tutorial we will modify a UIViewController to behave like a semi transparent Frosted Blur Glass. It will open like an overlay above our Main ViewController and you should be able to control the amount of blur through code. As you can see the screenshot below. We have 2 UIViewControllers and we can click the Add button on our FirstViewController to open the SecondViewController as an overlay with frost glass effect. There are various ways by which this can be achieved. The process by which i have achieved this is as follows: 1) First take a snapshot of the First View Controller once loaded. 2) Add Gaussian blur to the snapshot 3) Pass this snapshot to the Second View Controller 4) Use it as a background image for the Second View There are other ways by which also this can be achieved which i will post in future but this is the simplest way to do it. Step1: Setup the story board. Screenshot below to explain the configuration. Step 2: In the first view controller we will have to take the snapshot and then pass it to second view controller. Apple has provided some nice API to take the snapshot. We will be using these APIs. As we are going to pass the image from our first view to the 2nd view we will need to use prepareForSegue function to pass the values. Lets override this method in our first view controller and write our code to take the snapshot. The code snipped looks like this.
override func prepareForSegue(segue: UIStoryboardSegue!, sender: AnyObject!) {

        println("Entering prepareForSegue")

        var secondView:SecondViewController = segue.destinationViewController as SecondViewController;


        var snapshotView:UIView = view.snapshotViewAfterScreenUpdates(true)

        UIGraphicsBeginImageContextWithOptions(view.bounds.size, true, 0.0)

        snapshotView.drawViewHierarchyInRect(view.bounds, afterScreenUpdates: true)

        var imgaa :UIImage = UIGraphicsGetImageFromCurrentImageContext();


        var ciimage :CIImage = CIImage(image: imgaa)

        var filter : CIFilter = CIFilter(name:"CIGaussianBlur")

        filter.setDefaults()

        filter.setValue(ciimage, forKey: kCIInputImageKey)

        filter.setValue(30, forKey: kCIInputRadiusKey)


        var outputImage : CIImage = filter.outputImage;

        var finalImage :UIImage = UIImage(CIImage: outputImage)


        secondView.background = finalImage


        UIGraphicsEndImageContext();


        println("Exit prepareForSegue")

    }
Let me explain what each part do.
var secondView:SecondViewController = segue.destinationViewController as SecondViewController;
The above code is used to access the destination View controller. The data will be passed to it.
      var snapshotView:UIView = view.snapshotViewAfterScreenUpdates(true)

        UIGraphicsBeginImageContextWithOptions(view.bounds.size, true, 0.0)

        snapshotView.drawViewHierarchyInRect(view.bounds, afterScreenUpdates: true)

        var imgaa :UIImage = UIGraphicsGetImageFromCurrentImageContext();
In the above code we take a screen shot of the first view and change it to UIImage.
        var ciimage :CIImage = CIImage(image: imgaa)

        var filter : CIFilter = CIFilter(name:"CIGaussianBlur")

        filter.setDefaults()

        filter.setValue(ciimage, forKey: kCIInputImageKey)

        filter.setValue(30, forKey: kCIInputRadiusKey)

        var outputImage : CIImage = filter.outputImage;
Here we have created a CIFilter and applied CIGaussianBlur on the image which we have taken screenshot.
Note that you can modify the
kCIInputRadiusKey
value to set the amount of blur.
Finally we set the blur image to our second view controller as follows
Step 3: In the second view controller we will use this image as background.
class SecondViewController: UIViewController {

    var background :UIImage = UIImage.alloc()


    override func viewDidLoad() {

        super.viewDidLoad()

        var imageView: UIImageView = UIImageView(image: background)

        imageView.frame = CGRectMake(0, 0, view.frame.size.width, view.frame.size.height)

        self.view.addSubview(imageView)

        //Adding some text over the semi transperent overlay

        var plainUIView :UIView = UIView(frame: CGRect(x: 0, y: 100, width: 320, height: 200))

        plainUIView.backgroundColor = UIColor.whiteColor()

        var someText :UILabel = UILabel(frame: CGRect(x: 0, y: 130, width: 320, height: 50))

        someText.numberOfLines = 2

        someText.text = "I can write or put anything here. n @Classic Tutorials"

        plainUIView.addSubview(someText)

        self.view.addSubview(plainUIView)

    }
}
If you want to play around with the brightness or glare of the background blur you can try adding
imageView.alpha = 0.5
where the value can be between 0.0 to 1.
Update: 20th June 2015:
I got some comments around the screen turns black on device but works fine on simulator. Try this code to replace the part where we are taking the screenshot.
    func takeScreenshot() -> UIImage{

            let layer = UIApplication.sharedApplication().keyWindow?.layer
            let scale = UIScreen.mainScreen().scale
            UIGraphicsBeginImageContextWithOptions(layer!.frame.size, false, scale);

            layer!.renderInContext(UIGraphicsGetCurrentContext())
            let screenshot = UIGraphicsGetImageFromCurrentImageContext()
            UIGraphicsEndImageContext()

        println("Taking Screenshit")
        return screenshot