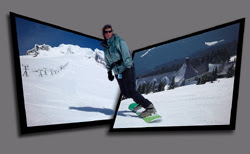
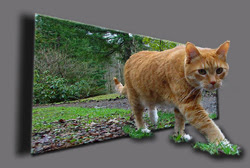
An Out of Bounds entry, referred to as OOB throughout this tutorial, refers to an entry which makes use of the image borders to add to the 3D feel of the image.
This is how "I" do it, mostly. Though I only use Photoshop, I'm sure all the same ideas can be applied to whatever program you are using.
The single most important element in any OOB entry is the source picture. I'm a purist, so I tend to only use ONE source pic, so I will be showing you how to go from iths..
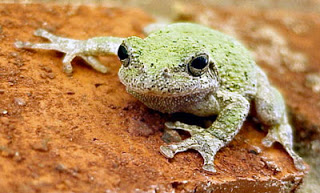
to this (which is not exactly like my original entry, but I chose to do this over for the tutorial)
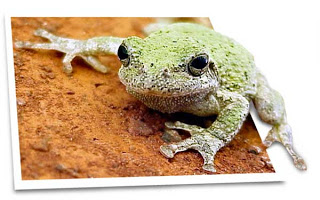 .
.
Here we go..
he very first thing I do is set up my layers palette like this...
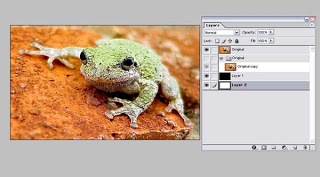
I have a back up for the original source pic, and two background layers, one black, one white. I use these while I'm masking as you'll see soon.
Next, above my original layer, I create a "Frame" layer. I add layer masks to both the Original and the Frame layer. Now, the setup is complete.
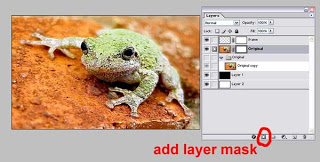
Next, I take a few moments to look closely at the original and decide where the best perspective is for my frame, the part that will set it "out of bounds". Since this shot has such a great natural perspective, I'll be working with that, making the front part of the frog the focus "in-frame" and his back legs "out of frame" as if he was walking into the picture.
In the Frame layer I'll draw a white rectangle of the approximate size I'd like my finished frame to be.
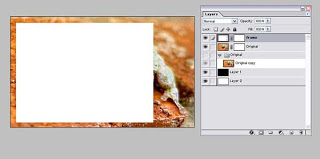
I'll then make a selection inside the box to allow for the thickness of the border. And cut away the excess. (CTRL-X)
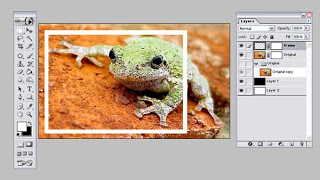
Finally, with the Frame layer selected, I choose Edit-Transform-Perspective (CTRL+T then right click - Perspective) and adjust the top and right sides of the frame slightly. (There are no secret numbers here, this is very much subjective to the picture and 'eyeing' the adjustments is the only way.)
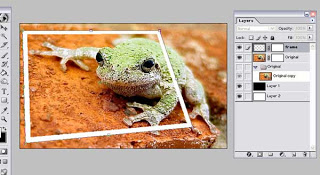
I then use the Distort Transform (CTRL+T then right click - Distort) to adjust the frame to allow all the frog bits I want in and out of frame.
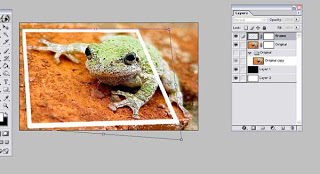
When I'm satisfied with the frame placement, then it's off to masking.
There are numerous ways to make selections for masking, the pen tool (which would be a tutorial in itself) the lasso tool, quick masking. I'm going just select my layer mask on the original and paint with black all the areas that I don't want to show. I click on the white layer mask box in the Original layer. The small circle in box icon appears next to the layer picture and I know I'm painting ONLY in the mask. As you can see, as I paint with black, the image disappears (or is masked out). Painting with white reveals (or unmasks) the Original layer. I've turned off the Black and White layers (Layer 1 and Layer 2) for now, we'll use them when we closer to the edges of the frog.
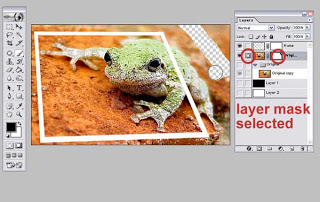
I've completely masked out all parts of the background that would fall 'out of frame'. As you can see it's pretty rough at this point. Next well go in close and do some fine tuning on the mask.
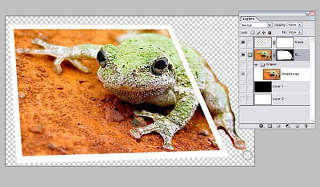
Now, let's zoom in on our frog's hindquarters and get some serious masking done. I'm using a soft 10pt brush with the air brush turned on to mask closer to the contours of the back and legs. Remember, if you mask over part of the frog, you can always select white as your paint color and reveal it again.
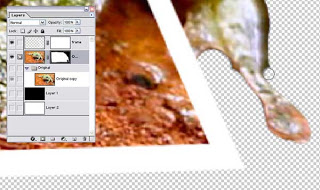
Now that I've fine tuned the mask closer to the frog, I turn on either the black (Layer 1) or white (Layer 2) background layers. This is nothing more than a way to help reveal areas that still need to be masked out, in this case the rust colored background shows up very well against the white, so I'll keep that one turned on.
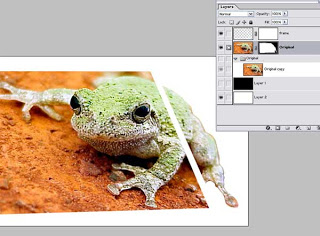
Using a combination of smaller brushes, and the smudge tool on the layer mask (which will smudge the black painted areas into the white of the layer mask, giving a little more control over the detail work) I completely eliminate all notions of the background. Remember, working with layer masks is virtually foolproof. You can reveal what you mistakenly masked, or discard the entire mask and start again. After some tweaking and even finer tuning, I have this...
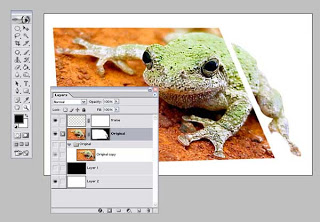
now, onto the frame...
I select the layer mask on the Frame layer. Now we'll remove the parts of the frame where we'd like the frog to overlap. In this case, it's helpful to me to have the black (layer 1) background layer turned on, since my frame is white.
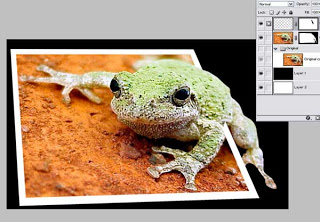
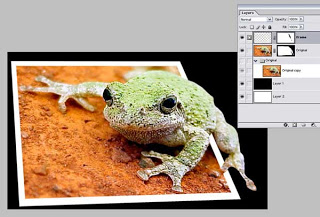
Using the same masking principles as before, I begin removing the frame up to the edges of the frog, giving the illusion that the frame runs behind him. When I've revealed all I want to reveal, it's time to start adding some shadows. There are differing views on shadows in OOB and where to add them. I like them when they're dramatic enough to give extra depth, yet subtle enough to not scream LOOK AT MY SHADOWS. Most importantly, we want to match the light from the source pic, which appears to be coming from the top left.
I'll add two layers for the shadows. The first for the frame which I'll call Frame Shadow. This will be placed above the Frame layer and grouped to it (CTRL+G) so all the painting I do on the Frame Shadow layer will ONLY be visible within the confines of the Frame. The shadow for underneath the 'out of frame' portions of the Frog will be painted on the Frog Shadow layer, underneath the Original.
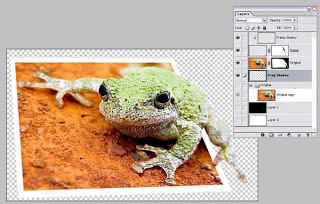
On the Frame Shadow layer, using a very soft brush with its opacity set to approx 75%, I'll paint where I think the shadows would fall. I do the same to the Frog Shadow layer, making sure my shadows line up with each other. I add the same Gaussian Blur to both shadow layers (in this case a blur of 4.0) and set both layers to Multiply in the blending mode.
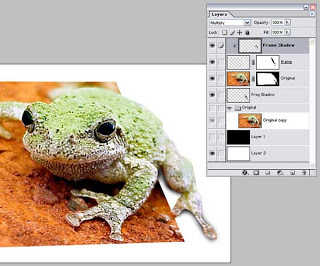
Next, I like to add a subtle shadow for the frame as well, to give a little extra dimension. I'll create a new layer under the Frog Shadow layer called Main Shadow and use the same technique there as described above. I've also lowered the opacity on all the shadow layers to make them more subtle.


This is how "I" do it, mostly. Though I only use Photoshop, I'm sure all the same ideas can be applied to whatever program you are using.
The single most important element in any OOB entry is the source picture. I'm a purist, so I tend to only use ONE source pic, so I will be showing you how to go from iths..

to this (which is not exactly like my original entry, but I chose to do this over for the tutorial)
 .
.Here we go..
he very first thing I do is set up my layers palette like this...

I have a back up for the original source pic, and two background layers, one black, one white. I use these while I'm masking as you'll see soon.
Next, above my original layer, I create a "Frame" layer. I add layer masks to both the Original and the Frame layer. Now, the setup is complete.

Next, I take a few moments to look closely at the original and decide where the best perspective is for my frame, the part that will set it "out of bounds". Since this shot has such a great natural perspective, I'll be working with that, making the front part of the frog the focus "in-frame" and his back legs "out of frame" as if he was walking into the picture.
In the Frame layer I'll draw a white rectangle of the approximate size I'd like my finished frame to be.

I'll then make a selection inside the box to allow for the thickness of the border. And cut away the excess. (CTRL-X)

Finally, with the Frame layer selected, I choose Edit-Transform-Perspective (CTRL+T then right click - Perspective) and adjust the top and right sides of the frame slightly. (There are no secret numbers here, this is very much subjective to the picture and 'eyeing' the adjustments is the only way.)

I then use the Distort Transform (CTRL+T then right click - Distort) to adjust the frame to allow all the frog bits I want in and out of frame.

When I'm satisfied with the frame placement, then it's off to masking.
There are numerous ways to make selections for masking, the pen tool (which would be a tutorial in itself) the lasso tool, quick masking. I'm going just select my layer mask on the original and paint with black all the areas that I don't want to show. I click on the white layer mask box in the Original layer. The small circle in box icon appears next to the layer picture and I know I'm painting ONLY in the mask. As you can see, as I paint with black, the image disappears (or is masked out). Painting with white reveals (or unmasks) the Original layer. I've turned off the Black and White layers (Layer 1 and Layer 2) for now, we'll use them when we closer to the edges of the frog.

I've completely masked out all parts of the background that would fall 'out of frame'. As you can see it's pretty rough at this point. Next well go in close and do some fine tuning on the mask.

Now, let's zoom in on our frog's hindquarters and get some serious masking done. I'm using a soft 10pt brush with the air brush turned on to mask closer to the contours of the back and legs. Remember, if you mask over part of the frog, you can always select white as your paint color and reveal it again.

Now that I've fine tuned the mask closer to the frog, I turn on either the black (Layer 1) or white (Layer 2) background layers. This is nothing more than a way to help reveal areas that still need to be masked out, in this case the rust colored background shows up very well against the white, so I'll keep that one turned on.

Using a combination of smaller brushes, and the smudge tool on the layer mask (which will smudge the black painted areas into the white of the layer mask, giving a little more control over the detail work) I completely eliminate all notions of the background. Remember, working with layer masks is virtually foolproof. You can reveal what you mistakenly masked, or discard the entire mask and start again. After some tweaking and even finer tuning, I have this...

now, onto the frame...
I select the layer mask on the Frame layer. Now we'll remove the parts of the frame where we'd like the frog to overlap. In this case, it's helpful to me to have the black (layer 1) background layer turned on, since my frame is white.


Using the same masking principles as before, I begin removing the frame up to the edges of the frog, giving the illusion that the frame runs behind him. When I've revealed all I want to reveal, it's time to start adding some shadows. There are differing views on shadows in OOB and where to add them. I like them when they're dramatic enough to give extra depth, yet subtle enough to not scream LOOK AT MY SHADOWS. Most importantly, we want to match the light from the source pic, which appears to be coming from the top left.
I'll add two layers for the shadows. The first for the frame which I'll call Frame Shadow. This will be placed above the Frame layer and grouped to it (CTRL+G) so all the painting I do on the Frame Shadow layer will ONLY be visible within the confines of the Frame. The shadow for underneath the 'out of frame' portions of the Frog will be painted on the Frog Shadow layer, underneath the Original.

On the Frame Shadow layer, using a very soft brush with its opacity set to approx 75%, I'll paint where I think the shadows would fall. I do the same to the Frog Shadow layer, making sure my shadows line up with each other. I add the same Gaussian Blur to both shadow layers (in this case a blur of 4.0) and set both layers to Multiply in the blending mode.

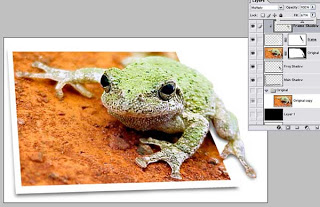
Next, I like to add a subtle shadow for the frame as well, to give a little extra dimension. I'll create a new layer under the Frog Shadow layer called Main Shadow and use the same technique there as described above. I've also lowered the opacity on all the shadow layers to make them more subtle.

And that's it. There is probably much more fine tuning on the shadows and the mask that can be done, but this is a basic idea of an Out of Bounds entry. I hope this was helpful in some small way. Feel free to email me with any additional questions, or if you think something needs more clarification.
Thanks and good luck!
some more examples.... try to do them
